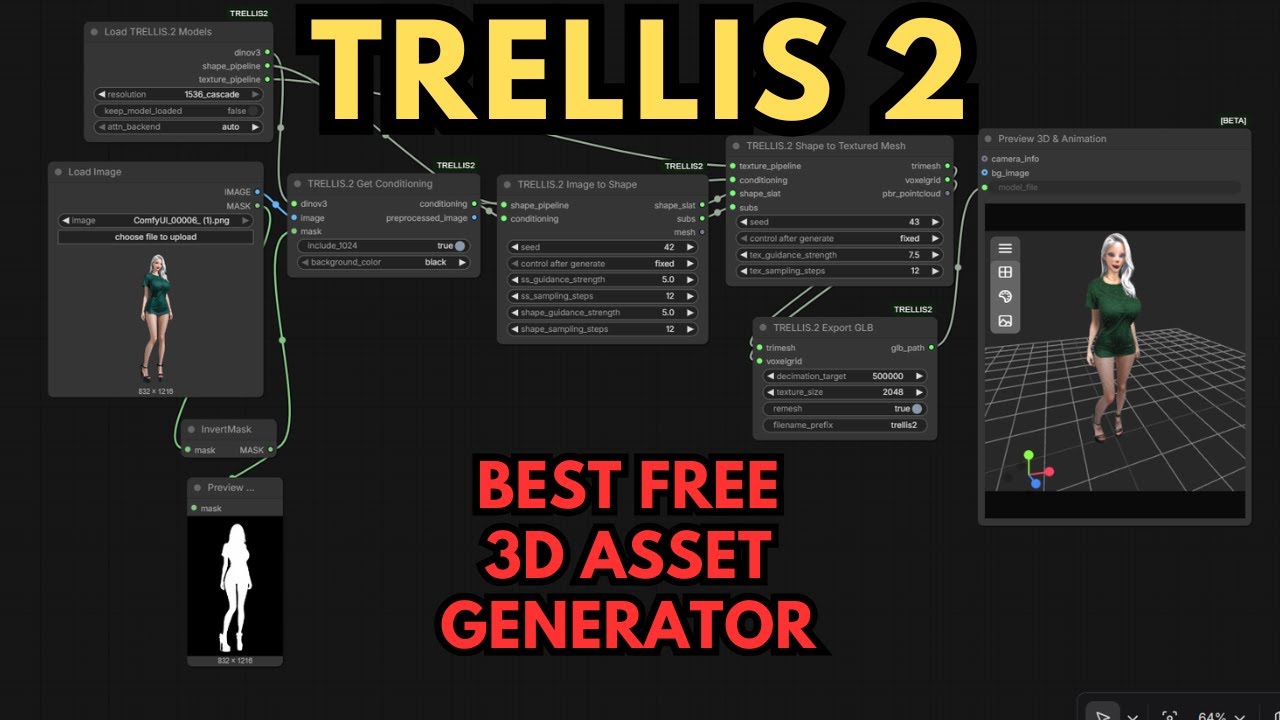
Microsoft just released Trellis 2 — a 4-billion-parameter image-to-3D model that generates production-ready assets complete with PBR (Physically Based Rendering) textures directly from a single image or text prompt. Released under the MIT license, it's free to use for personal and commercial projects, and the quality is a significant step above previous open-source 3D generation models.
Why Trellis 2 Is a Big Deal
In testing, Trellis 2 produces noticeably better results than other major models like Hunyuan 3D or Tripo — capturing fine detail at a level that's getting close to replacing many commercial 3D asset tools for hobbyists and indie developers.
Setup Options
Option A — One-Click Patreon Installer (Easiest)
A one-click Windows installer is available on Patreon that automatically installs ComfyUI and Flash Attention, then downloads all required Trellis 2 models into their correct folders. No manual configuration needed.
Option B — RunPod Template
A RunPod template is available that handles the entire installation on a cloud GPU in about 10 minutes. Ideal if your local GPU is below 16 GB VRAM or you want to avoid a lengthy local setup.
- Log in to RunPod, open the Pods menu, and select a GPU (RTX 5090 recommended for Trellis 2).
- In the Pod Template section, click Change Template and select the Trellis 2 RunPod template. Click Deploy GPU.
- Wait ~10 minutes for setup. When storage reaches about 14%, the install is complete. Click Connect next to ComfyUI to open the interface.
Option C — Manual Local Install (Windows)
If you're setting up manually on a local Windows machine:
-
Get ComfyUI Portable. Download the portable ZIP from the official ComfyUI repository. Extract it with 7-Zip.
-
Install the custom nodes. Navigate into the
custom_nodesfolder inside your ComfyUI directory. Click into the file explorer path bar, typecmd, and press Enter. Rungit clonefor both the ComfyUI Manager repository and the pizzazzi-andrea/trellis2 node repository. -
Install dependencies for the portable environment. Two specific commands must be run inside the directory containing the Python embedded folder to install Trellis 2's requirements correctly. Copy these from the written guide linked in the video description to avoid typos.
-
Install Flash Attention (optional but recommended). Flash Attention significantly reduces VRAM usage. If it doesn't install automatically, download the correct wheel file for your Python/CUDA version (link in video description) and install it manually. The workflow runs without it but will be more hardware-intensive.
custom_nodes via cmd is more reliable.
First Run — Loading the Workflow
-
Launch ComfyUI. Load the geometry only workflow provided with the Trellis 2 node (a good starting point).
-
You'll likely see red error nodes on first load. Open ComfyUI Manager → Install Missing Custom Nodes and look for the Geometry Pack. Install it, then restart ComfyUI and refresh your browser.
-
Prepare your input image. Trellis 2 works best with a clean image — background removed, leaving only the object. Use remove.bg or a background removal workflow for a clean PNG. (Note: the example workflow includes a built-in background removal node, but it can export the background as a mesh rather than producing the clean PNG you need.)
-
Run the workflow. The first run will automatically download all Trellis 2 models in the background — this takes a while. Make sure you have at least 30 GB of free storage space before starting.
Fixing Out-of-Memory (OOM) Errors
Even on high-VRAM cards, OOM errors can occur with Trellis 2. Two settings help the most:
OOM Fixes — Try These First
- Lower guidance strength values in the Trellis 2 Image to Shape node. These work like CFG — higher values produce more accurate outputs but demand more VRAM. Reducing them eases memory pressure, with a minor quality trade-off.
- Disable remesh settings in the Trellis 2 Export GB node. Turning off remesh has been shown to eliminate OOM errors in testing while preserving good output quality.
Quality Comparison
Trellis 2 represents a significant quality jump over previous open-source 3D generation options:
- vs. Hunyuan 3D: Trellis 2 captures finer geometric detail and produces better PBR textures out of the box.
- vs. Tripo: Similar tier, but Trellis 2's MIT license makes it more commercially accessible.
- Production readiness: Assets drop directly into game engines and VR projects without extensive post-processing.
Tips for Best Results
- Always remove the background from your source image before running — it significantly improves geometry accuracy.
- Start with the geometry-only workflow before trying the full texture workflow — it's faster to iterate.
- Ensure 30 GB+ free storage before the first run to avoid a failed model download mid-generation.
- On RunPod, wait until storage reaches ~14% before launching the interface — that's when the background install completes.
- Check the Samples tab on GitHub when updating the node — example workflows are often updated alongside node changes.
📦 Want to skip the setup?
The Local Lab offers pre-configured AI installer packages so you can get running in minutes, not hours.
Get the Installer →